

How To Add A Slideshow Button In Narattive Theme
Customise the product folio of the Narrative theme in Shopify
Added Nov 3, 2019: Some people withal had issues with this tutorial. With this curt update I'd similar to add two possible solutions that might help yous to customize the page accordingly. Nonetheless, Shopify still changes things too then it is hard to say whether it will piece of work and go on working.
ane: In stride three, i extra line of code is added (also reflected below in the text at present) '{{ '//ajax.googleapis.com/ajax/libs/jquery/1.vi.2/jquery.min.js' | script_tag }}'.
2: One of yous guys emailed me with the fact that changing the 'base' theme made information technology work for you. Thus, utilize the warm theme as your base and follow this tutorial.
Hope information technology works; if non, permit me know!Added Feb 1, 2019: First off, I'd similar to thank everyone for reading (and clapping) this post. Recently a few people messaged me about problems that kept occurring. Try to follow the steps below very advisedly. If you'd like y'all can too copy the code, add together the .js and .css files to Shopify and include them in theme.liquid (see step below). Adept luck!
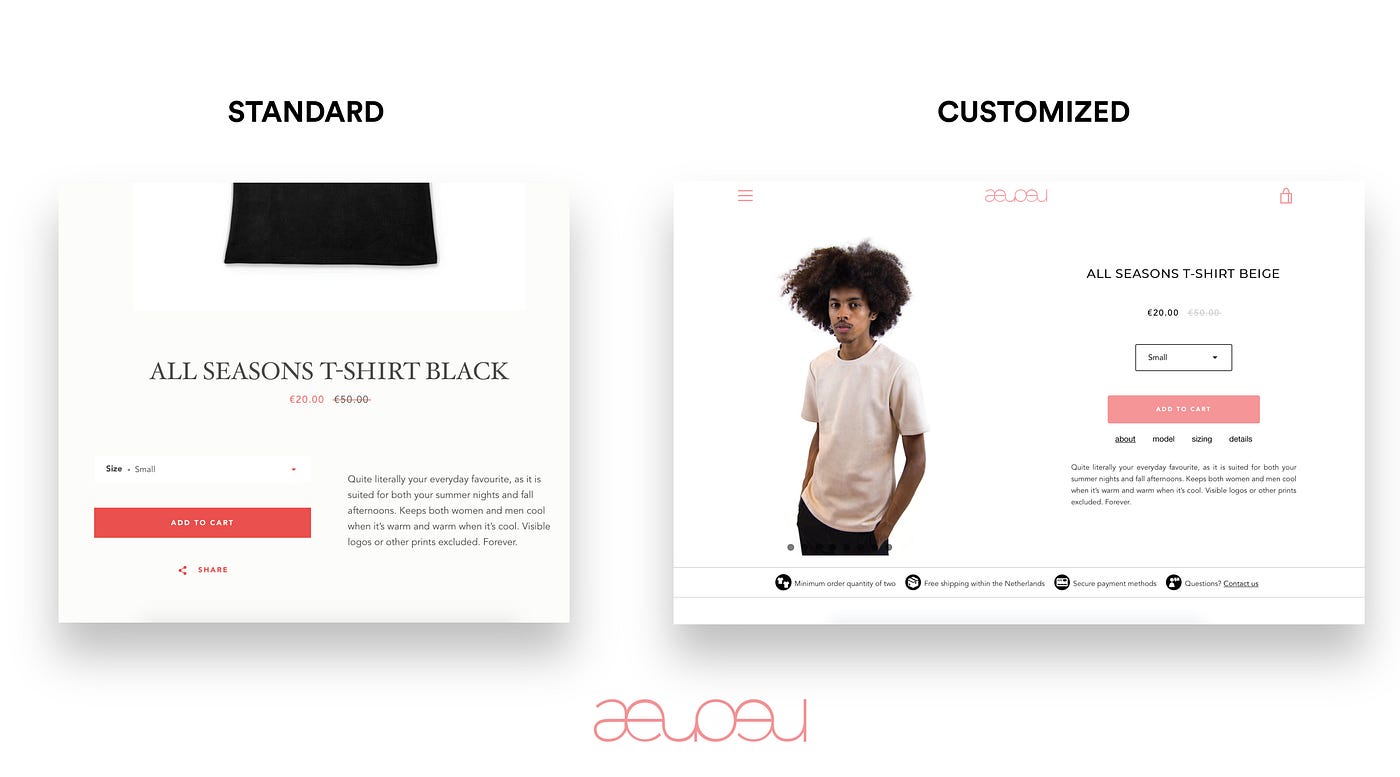
Well, here information technology is. Finally a guide to customize/modify your 'Narrative-themed' product page in Shopify with an imageslider, tabbed descriptions and 'unique selling points'. Just as tin be seen above.
Shopify is peachy, the Narrative theme is cute, merely unfortunately the production page is and so… so bad! Reason enough to change the production page to our own liking.
That was done in Baronial 2017, at the launch of our new webshop (which is now transferred into a i pager). And since that launch more than people accept asked the states how we changed the product page than people actually buying a T-shirt. 🤷♂️
So in this tutorial I will guide you into making a similar production folio, you can either re-create the unabridged product folio or simply use a few elements; whether that is the flexslider, the tabbed descriptions or the unique selling points on the bottom of the page.
Why did it accept so long to come with this guide — a.k.a. the answer to your question? Non beingness a coder, making this product page was quite difficult. So also putting my claret, sweat and tears into this — it took a considerable amount of time to get everything to work — while not breaking the rest of the website 👾. Likewise after the product folio was created, I also forgot how I made it function and therefore constitute it hard to explain existent quick how it was done.
All of the elements will be explained and you can obtain the total code here, so you tin can figure out for yourself what you lot would like to use.
Grid arrangement
First matter you have to realise is the grid arrangement of Shopify. A medium-upwardly — one-half grid system was created, so that the image was on the left and the description of the product on the right. This was done to create a better conversion as the user does not have to scroll down and all information is displayed immediately after the folio loads. Oh… and it also looks better.
Flexslider
In this function I will explain how to install the Flexslider, which might exist the most difficult part.
- Download Flexslider and unzip the folder.
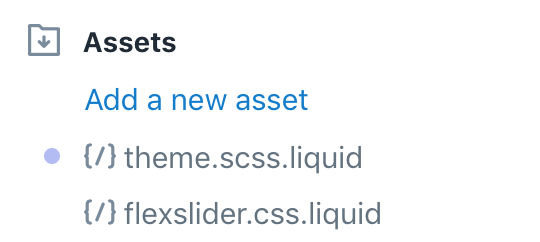
2. Upload the files jquery.flexslider-min.js, jquery.flexslider.js and flexslider.css to your files in Shopify. You do this by going to your Shopify dashboard > Online stores > Actions > Edit code > Gyre downward to avails and upload information technology.
3. In theme.liquid add together the following lines:
{{ '//ajax.googleapis.com/ajax/libs/jquery/1.6.2/jquery.min.js' | script_tag }} <script src="{{ 'jquery.flexslider-min.js' | asset_url }}" defer="defer"></script> <script src="{{ 'jquery.flexslider.js' | asset_url }}" defer="defer"></script> {{ 'flexslider.css' | asset_url | stylesheet_tag }}
4. Create a new production template and name it product-template2.liquid.
Yous could edit the current product template file but by all means information technology's non recommended. If something breaks, you lot should ever take your standard product template equally a backup then you know you can keep your webshop running.
Change the code inside 'Product Featured Paradigm' up to 'Product Form & Description' past the lawmaking given beneath.
Notation: the code beneath simply shows how to make the flexslider as part of the left half of your screen in combination with the rest of the page. Play effectually with the grids to your own liking. You could also copy the entire code of the product template and follow the steps below.
<div class="product__content page-width--wide"> <div class="filigree"> <div class="grid__item medium-upwardly--one-one-half"> <div class="flexslider"> <ul form="slides"> {% for image in product.images %} {% assign max_height = 650 %} {% assign max_width = 980 %} {% assign max_aspect_ratio = ane.50769 %} {% if image.aspect_ratio < max_aspect_ratio%} {% if epitome.height < max_height %} {% assign max_width = image.width | times: image.aspect_ratio | circular %} {% else %} {% assign max_width = max_height | times: prototype.aspect_ratio | round %} {% endif %} {% else %} {% if paradigm.width < max_width %} {% assign max_width = paradigm.width %} {% endif %} {% endif %} <li> {{ image | product_img_url: 'original' | img_tag }} </li> {% endfor %} </ul> </div> <script type="text/javascript"> $(window).load(function() { $('.flexslider').flexslider({ blitheness: "slide", directionNav: true }); }); </script> </div>
v. In product templates, go to production.liquid and alter the template proper name to the one you merely created.

Tabbed Description
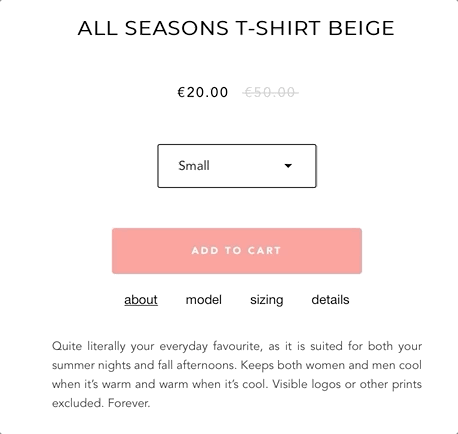
The tabbed description allows for more than information while still maintaining a make clean product page. The code for the tabbed description can be constitute below with the style sheet.
Because information for every product may be different, product tags are used. Then a product tag like 'shirt-beige' is added to the product and a snippet has been added to the lawmaking editor with the aforementioned name.
This was done to easily customise descriptions and have a more clear code in the production template.
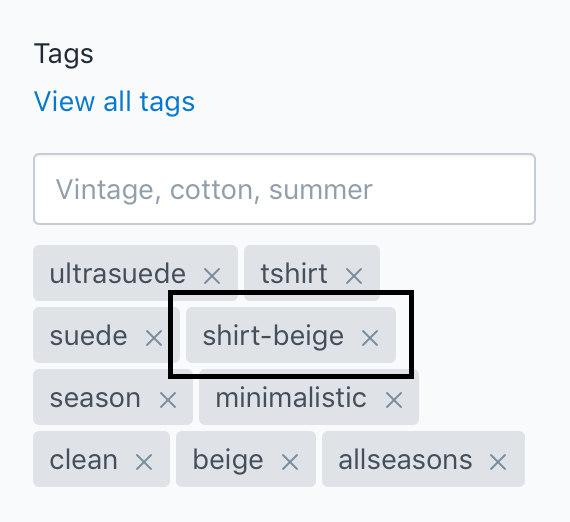

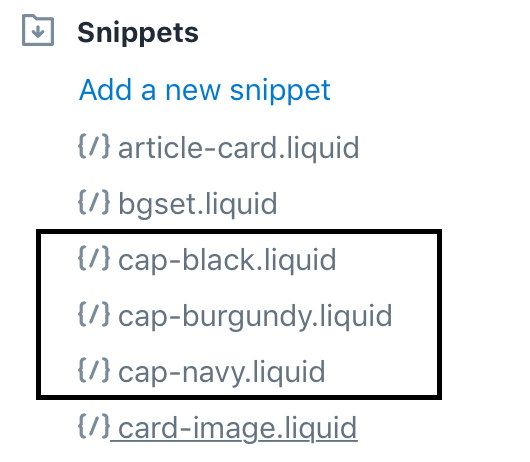
<ul class="tabs"> <li><a href="#tab-i">nearly</a></li> <li><a href="#tab-2">model</a></li> <li><a href="#tab-three">sizing</a></li> <li><a href="#tab-4">details</a></li> </ul> <div class="prodescript"> <div id="tab-one"> {{ product.description }} </div> <div id="tab-ii"> {% if product.tags contains 'shirt-beige' %} <div> {% include 'shirt-beige' %} </div> {% endif %} {% if product.tags contains 'shirt-black' %} <div> {% include 'shirt-blackness' %} </div> {% endif %} {% if production.tags contains 'shirt-lightblue' %} <div> {% include 'shirt-lightblue' %} </div> {% endif %} {% if product.tags contains 'cap-navy' %} <div> {% include 'cap-navy' %} </div> {% endif %} {% if production.tags contains 'cap-black' %} <div> {% include 'cap-black' %} </div> {% endif %} {% if production.tags contains 'cap-burgundy' %} <div> {% include 'cap-burgundy' %} </div> {% endif %} </div> <div id="tab-three"> {% if production.tags contains 'cap' %} <div> {% include 'sizing-cap' %} </div> {% endif %} {% if product.tags contains 'tshirt' %} <div> {% include 'sizing-shirt' %} </div> {% endif %} </div> <div id="tab-4"> {% if product.tags contains 'cap' %} <div> {% include 'details-cap' %} </div> {% endif %} {% if production.tags contains 'tshirt' %} <div> {% include 'details-shirt' %} </div> {% endif %} </div> </div> </div> </div> </div> </div> </style> .usp { edge-top: 1px solid #d0d0d0; border-lesser: 1px solid #d0d0d0; font-family: Avenir !important; font-size: 12px; acme: 50px; overflow: auto; white-space: nowrap; text-align: center; -ms-transform: translateY(-l%); -webkit-transform: translateY(-l%); transform: translateY(-50%); @include media-query($pocket-sized) { display: cake; position: relative; width: 100%; } } .usp td { font-family: Avenir; color: #ff9696; summit: twenty%; position: relative; -ms-transform: translateY(-fifty%); -webkit-transform: translateY(-50%); transform: translateY(-50%); } .usp a { color: #000000; } .prodescript { text-align: justify; font-size: 12px !important; padding: 0 (4* $grid-gutter); } </style>
Unique Selling Points
The unique selling points on the bottom of the page is cypher besides fancy. Just a slice of text and an image as an icon. The borders are created with css, run across the code for 'border-top' and 'border-bottom'. This was done more than a year ago, then nowadays I would definitely recommend to employ Font Crawly instead of images!
<div class="usp"> <img src="https://cdn.shopify.com/s/files/1/1369/6043/files/aeuoeu_-_icons_-_shipping.png?15306569674648658830"> <td>Costless shipping within kingdom of the netherlands on orders over €50</td> <img src="https://cdn.shopify.com/southward/files/ane/1369/6043/files/aeuoeu_-_icons_-_payment_methods.png?15306569674648658830"> <td>Secure payment methods</td> <img src="https://cdn.shopify.com/southward/files/one/1369/6043/files/aeuoeu_-_icons_-_questions.png?15306569674648658830"> <td>Questions? <a href="http://aeuo.european union/pages/contact">Contact us</a></td> </div> <script type="application/json" data-product-json> {{ product | json }} </script> <script type="awarding/json" data-variant-json> {{ current_variant | json }} </script> </div> <way>
.usp { border-top: 1px solid #d0d0d0; border-bottom: 1px solid #d0d0d0; font-family unit: Avenir !of import; font-size: 12px; height: 50px; overflow: auto; white-space: nowrap; text-align: centre; -ms-transform: translateY(-50%); -webkit-transform: translateY(-l%); transform: translateY(-50%); @include media-query($small) { display: block; position: relative; width: 100%; } } .usp td { font-family unit: Avenir; color: #ff9696; top: 20%; position: relative; -ms-transform: translateY(-50%); -webkit-transform: translateY(-50%); transform: translateY(-50%); } .usp a { color: #000000; } .prodescript { text-align: justify; font-size: 12px !important; padding: 0 (4* $grid-gutter); } </style>
Then, that's nearly it. I exercise recommend you to follow the steps above, download the code and have a look at information technology yourself. Don't forget to include the jquery and the stylesheet. I hope information technology works for you, if not please let me know! 🤞
Once once again I'd similar to point that I'chiliad not a coder past profession and therefore some of the lawmaking might not be optimised or improve solutions might exist. I just wrote this article for the many people who have been asking u.s.a. how the hell nosotros changed the production page. This is how we did it — and it worked (and all the same does).
My name is pherkan, I'g a Dutch-Turkish Product Designer based in The Hague.
Every once in a while I like to write nigh productivity, apps, travel, self-comeback and Shopify customisations.
👏 Clap this story below if you liked it and follow me here to read more. 👏

How To Add A Slideshow Button In Narattive Theme,
Source: https://medium.com/@pherkan/customize-the-product-page-of-the-narrative-theme-in-shopify-1c617cf7f76b
Posted by: aginpegare.blogspot.com
0 Response to "How To Add A Slideshow Button In Narattive Theme"
Post a Comment